I have two PC’s in my house. One is my primary desktop which is the family PC running Windows 7 Ultimate. The other is used a Media Center Server (let us call it MCPC). After I got my iPhone, iPad and AppleTV I have moved all my digital media from Zune to iTunes (who knows when I buy Nokia Lumia 800 or a later Windows Phone, I will need to do the reverse all over again). My favourite application to convert DVDs and VCDs that I own into iTunes/Zune format is a free tool called “Handbrake” (that I had written about earlier).
My MCPC was about 4 years old, has outlived and needed an upgrade very badly. The MCPC had an AMD Athlon 64 X2 Dual Core 6000+ CPU, 4GB DDR2 RAM and an ASUS M2NBP motherboard with NVIDIA Quadro NVS210S GPU. Instead of throwing away the entire PC I decided to retain as much as I can and upgrade only the portions I needed to, which meant I can’t change the CPU or RAM, without changing all the three (Motherboard, CPU and RAM).
- The first item that I replaced was the 3-year-old 1 KVA UPS from APC that I had been using to connect both the PCs. I shopped around for a 2 KVA with 2 Hours backup, but it turned out to be expensive (Rs.40,000 to 60,000 depending on features & brand) and huge in size to fit under my desk. Instead, I went with 2 separate UPS each giving about 30 minutes backup time, first was a 1 KVA (APC Back-UPS RS 1000) and the second was a 1.5 KVA (APC Back-UPS RS 1500). Both costs together Rs.18,200 and it provided the convenience of using one of the PCs even when the other UPS dies out of its power. Both the UPS came with PowerChute client software which helps you to monitor the input voltage, set the input power sensitivity, set the voltage range and importantly shut-down the PC automatically when Power is about to run out – which ensures your drives are not corrupted. APC provides an RJ-45 to USB cable and software drivers to do this magic.
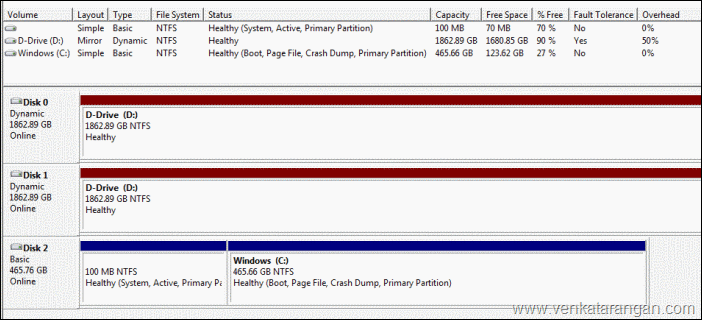
- With the ever-expanding size of my Digital Media (Music, Photos, Movies and TV Shows) stored in iTunes and as folders, I needed bigger hard-disks and also redundancy. So I replaced all the hard-drives and went in for 3 new HDDs – 1 x Seagate 500GB (Rs.2350), 2x 2TB (each Rs.4350). I didn’t choose Solid-State as they were expensive and anyway I thought I can buy a new PC with SSD in next few years. I configured the 500GB for the OS (Boot & System Partition for Windows 7) and the two 2TB as one single drive (Windows 7 Mirroring). I went for Software (Windows OS) Mirroring and not the BIOS which I was using earlier, as BIOS mirroring kept getting broken very often (may be due to the frequent Power shut-downs and problems with my UPS). It turns out this works great, only the first time I had to open Disk Management (Computer Management) and leave it open for the drives to Resync.
- Then I went on to replace the graphics card (NVIDIA Quadro NVS210S GPU) which started producing washed out colours and lack of sharpness in the output. This meant purchasing a new add-on PCI Express Graphics Card. I selected an affordable one from ASUS called “HD 5450 Silent” costing Rs.2300 and featuring AMD ATI Radeon HD 5450 & 1GB DDR3 video memory.
 (Output from my old GPU, taken with iPhone4) |
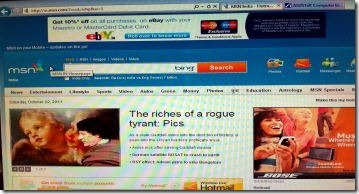 (Output from my new GPU, taken with the same iPhone4) |
- You can’t get an improvement just by changing the GPU, you will need a matching monitor as well. So I replaced my old HP 15” TFT with a new ViewSonic VA1931WMA-LED 19” Monitor which costs Rs.5390. I wanted a monitor that is not state of art (and hence expensive) and one which had a built-in speaker (which limited the options dramatically). Remember I am using this as a Media Center PC with occasional YouTube & iTunes watching, so there was no need for a real speaker or a higher resolution display. I tried to have built-in USB Hub, but I couldn’t find one.
- Now it is time to focus on USB ports. The built-in USB ports tended to be slow and flaky (may be due to MagicJack or many other USB devices that I connected over the years). Getting new USB ports was the easiest and cheapest, it costs about Rs.250 to buy a 4 Port USB 2.0 add-on card. To get the USB ports in the front (instead of bending and reaching in the back of the PC) I purchased a Belkin 4 Port 2.0 Powered Hub for about Rs.800.
- The next item was to look at the Network equipment (Ethernet Switch). I was using a 100Mbps Switch to connect my Wireless Router, Desktop, MCPC and other Ethernet ports in the house (like the one going to Apple TV or Daisy Chain). I upgraded this with a faster switch – a Netgear GS608 8Port Gigabit Switch which costs Rs.2475, this gives a smoother playing from iTunes Home Sharing.
- The last item was a WD 1 TB USB External HDD which costs about Rs.5000. This is to carry select media that I will be interested to have during my travel trips.
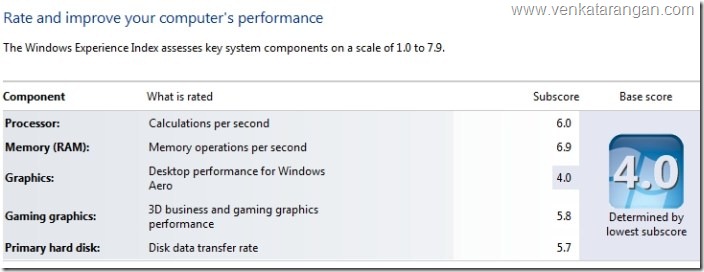
Overall the PC now manages to get about 4.0 (from 3.0 or so earlier) in Windows performance rating:
Final steps were to set up Windows to auto-login, launch iTunes automatically. I did the first using “User Accounts” (instructions here and here) and the second was done using Task Scheduler with a Trigger “When I log on”.




You could have bought a double battery invertor at that cost
Yes, that’s what I did recently. I got a Luminous 2000VA Home UPS (Invertor) for Rs.13,000, added two 150AH Tubular batteries at Rs.23,000. Connected this before the APC 1500VA UPS. Now I get several hours of uninterrupted near-pure power.