

I always had an interest in electrical appliances and played (!) with our household wirings & experimented with electronic gadgets/kits from my school days and that led me to take up Electrical & Electronics Engineering for my graduation. In my school days, I was about to touch/contact live wires a couple of times, giving the scare of their lives to my parents! But those were decades ago.
Over the years, as household electrical appliances and switchboards became complicated and finicky, I stopped doing DIY and leave it to experts (electricians) as it was cheaper, faster and safer for them to do. With the lockdown in India, I had to get my hands dirty a few times and most often things didn’t go as planned.
In March when the first lockdown came, I tried to fix a broken water valve (without knowing the model we had can’t be fixed) and I made it worse than before – later when a plumber came, he fixed it with a new one in a few minutes.

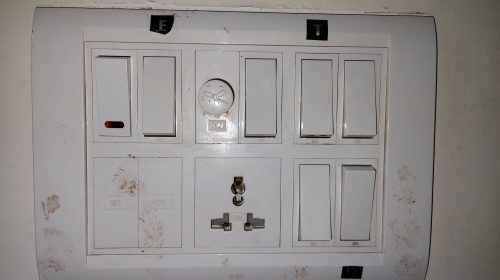
Today, with the new lockdown in Chennai in place, the water heater was not switching ON – don’t ask me why we need a heater during the hottest summer days here (answer = my mom). Tracing the problem from the mainboard to the heater power socket, I guessed it was to a broken switch as the indicator light was not glowing but other switches in the same switchboard working. I carefully opened the switchboard (the modern-day modular switches are only fancy items, they are fragile, so a wrong turn/overpressure applied will break everything) and yes it was a burned-out switch with neon light. Luckily, I had a spare switch. But it was not straightforward.
Normally, single throw switches have only two ports (one for live power-in and the other power-out) but this one had three – the reason should’ve been obvious for me as it just required commonsense (I can be stupid at times), but I was left scratching my head for a good ten minutes and then after opening the pack of the new switch it came to me. The third port was a neutral connection needed for the neon light to glow. Having figured out the setup, it was a matter of simple steps: switching off the electrical mains and inverter; removing the old switch; putting the new switch in place; trimming the wires; connecting all the ports and putting the switchboard back to the position; powering ON and testing. It worked out well.
Update 27th June 2020: Today, one more switch problem. This time, the bathroom two-way switch that’s near the door broke and the top came off. Without the copper connector in place, I was not able to switch ON the light inside the bathroom with the other switch. So after careful attempts, I managed to place the copper connector inside the broken switch, turn it into a position, so that I could operate the light with the other switch.

Discover more from Mangoidiots
Subscribe to get the latest posts sent to your email.
I think few youtube videos would have helped you , I started replacing these things after seeing you tube videos, hope it helps :)