

Nearly four years back when I last did network wiring & setup in my home, I used two wireless (Wi-Fi) access points daisy chained. Though it worked fine, I had to configure two SSIDs in mobile devices. This problem became acute with the proliferation of mobile devices in the house, at last count I had about 6 wireless devices – My main phone (Nokia Lumia 925), Wife’s phone (Nokia Lumia 820), my Surface Pro, her iPad3, my backup phone (Micromax A90S) and Son’s Laptop. I had an Airtel DSL broadband connection and a manual failover with a BSNL DSL broadband connection. Though the Airtel connection was stable and went down rarely, an automatic failover and load-balancing the traffic (so that I don’t waste the free traffic in BSNL) would be great. With 6 wired devices – Apple iMac, HP Officejet Pro 8600, Apple TV, XBOX 360, Toshiba TV, Tata SKY DTV automatic failover became a must have.
Disclosure: I write reviews about products that I have bought for my usage and paid in full. There were no sponsorship or advertisement, or commission of any sort involved in this post.
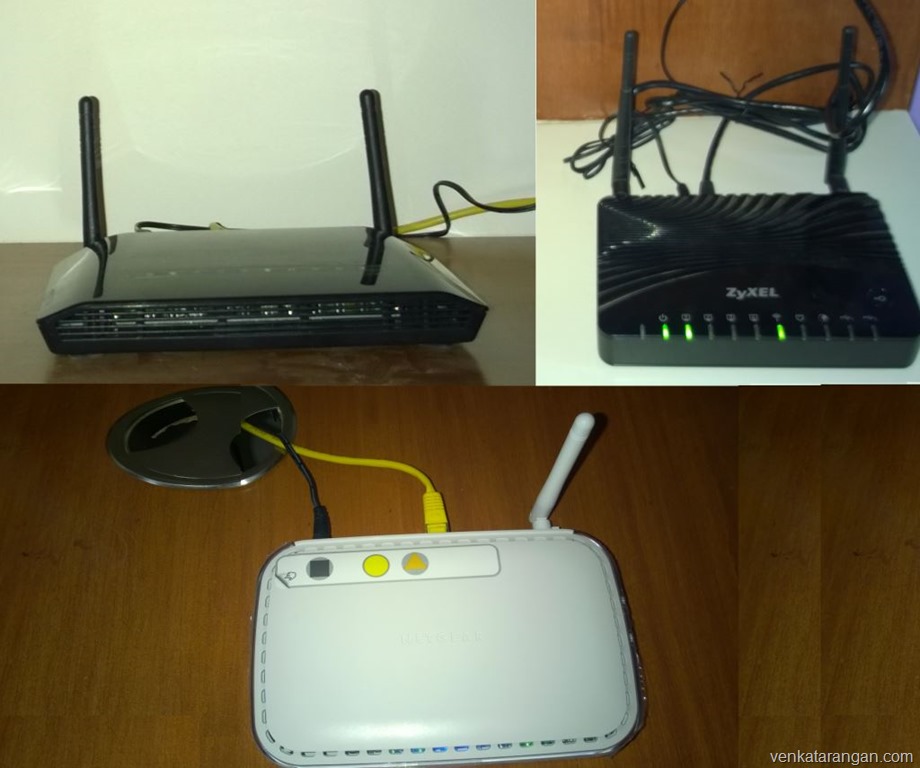
Thanks to articles in the Internet, I figured out I could multiple Access Points with the same SSID but getting a load-balancer at affordable price proved to be tough. I ended up spending days browsing online, visiting electronic stores in vain. Almost all the electronic shops didn’t understand what I wanted, but thanks to a local store in my area I was made to speak with Zyxel sales person for Chennai. For load-balancing two DSL broadband connections he recommended me to go with Zyxel USG50 costing Rs.15,000!!!, it’s a powerful device with Dual-WAN, 4 Gigabit ports, IPSEC VPN, 3G WAN & more but it was an overkill for my home usage. I enquired with him for the lower end Zyxel SBG3300-N but was not available in India and at $250 in Amazon USA that too was expensive for my need.

Finally, I came across TP-Link Load Balance Broadband Router (TL-R470T+) which was available for Rs.3566 ($58) from Snapdeal.com. The device was compact, provided 4 configurable wired WAN Ethernet Ports and had good reviews about it. To connect the two DSL broadband RJ11 ports (Airtel, BSNL) I had, to the two WAN Ethernet ports in LB I had to buy two modems. That is to convert the analogue/Phone line RJ-11 to digital/Ethernet RJ-45. All the 3 DSL modems I had with me where with wireless Access Points, which I planned to reuse in multiple locations as Access Points. After a quick search I found TP-Link ADSL2+ Modem Router (TD-8817) for just Rs.852 again from Snapdeal.com, the product had good reviews in abroad sites as well as in Flipkart & Snapdeal from Indian users who vouched it worked well with both Airtel & BSNL broadband. The device was super compact & checking the user guide ensured it was easy to configure.
Top level steps:
Once I got the devices it was matter of connecting & configuring them. I managed to finish the whole task (Ethernet wiring was done prior and tested by Electrical Engineer) in about 5 hours.
1.The Airtel DSL connection went to TP-Link Modem1, BSNL DSL connection to TP-Link Modem2. Then it was configuring each of the modems to respective TELCO settings.
2. Once that was done, I connected an Ethernet cable from Modem1 (Airtel) to TP-Link Load-Balancer Port 1 (WAN port) and another cable from Modem2 (BSNL) to TP-Link Load-Balancer Port 2 (WAN/LAN Port). Then it was configuring the load-balancer which was fairly easy.
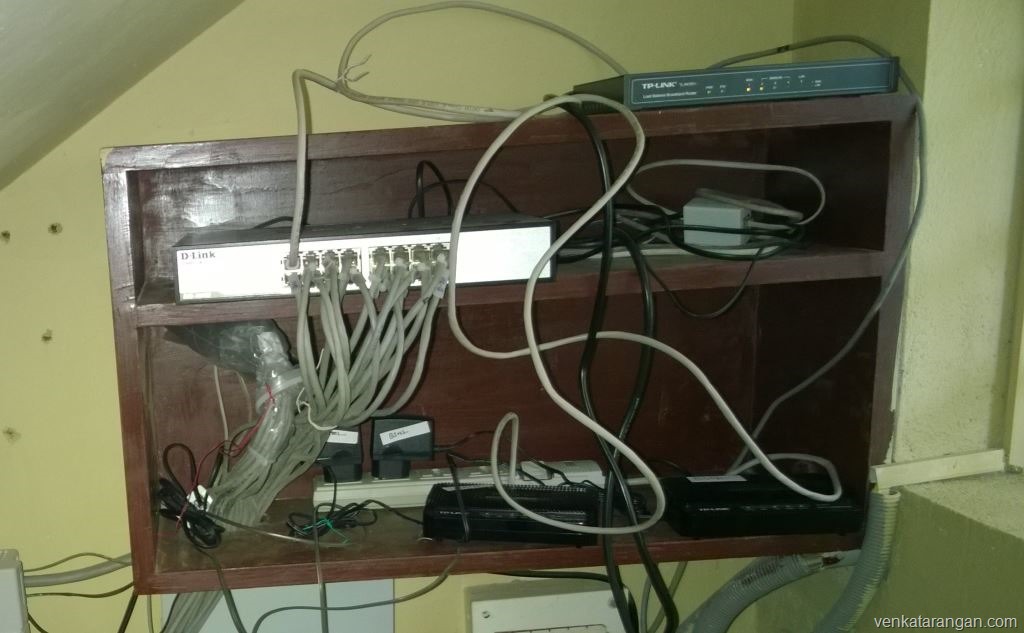
3. Connecting an Ethernet cable from LAN port of Load-Balancer to D-Link 16-Port Ethernet switch DGS-1016D I had.
4. Placing each of the 3 wireless Access Points I had in separate rooms (2 in first floor and 1 in ground floor of my house) and connecting them to individual Ethernet ports (which was connected by wire to D-Link Ethernet switch). Configuring each of the wireless Access Points by login to their respective consoles separately.
Configuration for each of the devices (3 + 3):
Airtel – TP Link Modem1 (TD8817)
Follow the instructions that came with the modem to connect & configure. It will involve powering the device, connecting an Ethernet cable from modem LAN port to your PC, connecting RJ-11 cable from your phone line splitter device, then opening a web browser in your PC to go to http://192.168.1.1. Default username and password both are admin.
- Change the device password from default to something secure
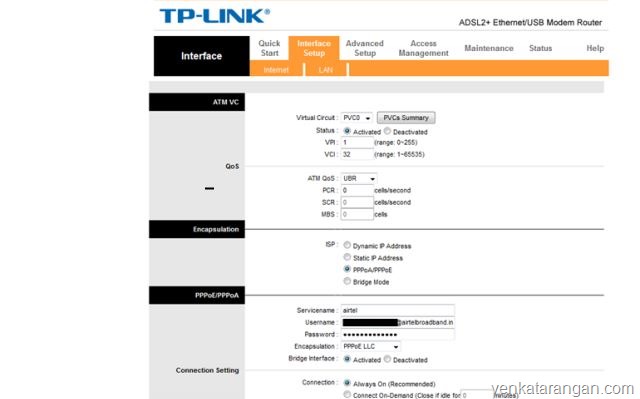
- In Interface Setup-Internet, change Virtual Circuit to PVC0, VPI: 1, VCI: 32, ATM QoS: UBR, ISP: PPPoA/PPPoE. In Servicename: Airtel, Username: <Airtel given username>, Password: <Airtel given password>, Encapsulated: PPPoE LLC, Bridge Interface: Activated. In IP Address Get IP Address: Dynamic, NAT: Enable
- Lastly in Interface Setup-LAN, Router Local IP section change IP Address: 192.168.2.1, IP subnet mask: 255.255.255.0, DHCP: Disabled. I am basically created a different subnet for this (Airtel) connection by opting for last but one octet as 2, as I plan to create a different subnet for the BSNL modem.
- Once you save the settings, you may not get the page reloaded but that’s fine. It will be a good idea to check whether you are able to browse the internet after the modem restarts. Since we have disabled DHCP, your PC won’t get an IP address, so you need to manually assign an IP say 192.168.2.40, subnet 255.255.255.0 and gateway as 192.168.2.1. Remember to remove this manual IP settings in your PC before you connect your next device to your PC.
BSNL – TP Link Modem2 (TD8817)
Follow the instructions that came with the modem to connect & configure. It will involve powering the device, connecting an Ethernet cable from modem LAN port to your PC, connecting RJ-11 cable from your phone line splitter device, then opening a web browser in your PC to go to http://192.168.1.1. Default username and password both are admin.

- Change the device password from default to something secure
- In Interface Setup-Internet, change Virtual Circuit to PVC2, VPI: 0, VCI: 35, ATM QoS: UBR, ISP: PPPoA/PPPoE. In Servicename: BSNLBroadband<your phone number 8 digits>, Username: <BSNL given username>, Password: <BSNL given password>, Encapsulated: PPPoE LLC, Bridge Interface: Activated. In IP Address Get IP Address: Dynamic, NAT: Enable
- Lastly in Interface Setup-LAN, Router Local IP section change IP Address: 192.168.1.1, IP subnet mask: 255.255.255.0, DHCP: Disabled. I am basically created a different subnet for this (BSNL) connection by opting for last but one octet as 1, as I have created a different subnet for the Airtel modem.
- Once you save the settings, you may not get the page reloaded but that’s fine. It will be a good idea to check whether you are able to browse the internet after the modem restarts. Since we have disabled DHCP, your PC won’t get an IP address, so you need to manually assign an IP say 192.168.1.40, subnet 255.255.255.0 and gateway as 192.168.1.1. Remember to remove this manual IP settings in your PC before you connect your next device to your PC.
Load Balancer – TP Link TL-R470T+

Follow the instructions that came with the router to connect & configure. It will involve powering the device, connecting an Ethernet cable from the LAN port (port 5) to your PC, then opening a web browser in your PC to go to http://192.168.0.1. Default username and password both are admin.
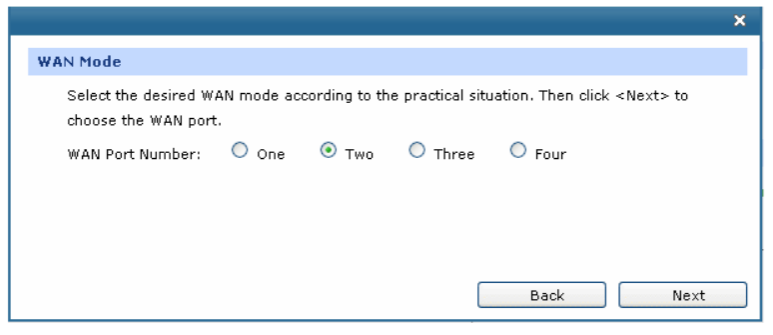
1.After a success login, when the quick setup dialog comes dismiss it. Select in the next screen the total WAN Ports as 2 (as that’s our case)
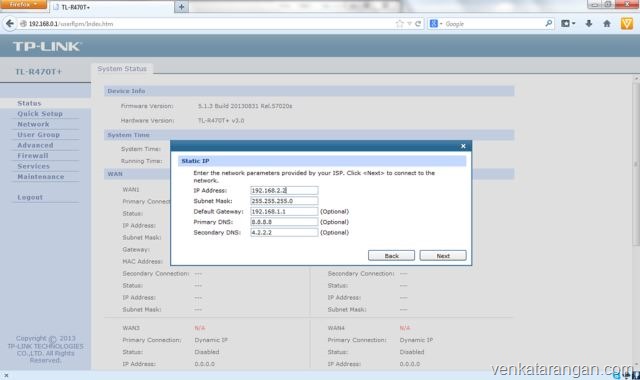
2. Choose WAN1 to be configured. Set WAN Connection type to Static IP. Enter IP: 192.168.2.2(has to be from the same subnet as Airtel Modem), Subnet: 255.255.255.0, Default Gateway: 192.168.2.1 (recollect this was our Airtel Modem IP), Primary DNS: 8.8.8.8 (Google Public DNS), Secondary DNS: 8.8.4.4.
3. Choose WAN1 to be configured. Set WAN Connection type to Static IP. Enter IP: 192.168.1.2(has to be from the same subnet as BSNL Modem), Subnet: 255.255.255.0, Default Gateway: 192.168.1.1 (recollect this was our BSNL Modem IP), Primary DNS: 8.8.8.8 (Google Public DNS), Secondary DNS: 8.8.4.4.
4. In Network-LAN-DHCP screen, DHCP Server: Enabled, Start IP Address: 192.168.0.50, End IP Address: 192.168.0.254, Lease time: 120, Default Gateway: 192.168.0.1, DNS Server 1: 8.8.8.8, DNS Server 2: 8.8.4.4
5. I didn’t do any changes in default Advanced-Traffic Control-Bandwidth Control screen. In the Advanced-Load Balance-Configuration page, select “Enable Bandwidth Based Balance Routing” and select WAN1 & WAN2 to distribute the load between the two DSL broadband connection.
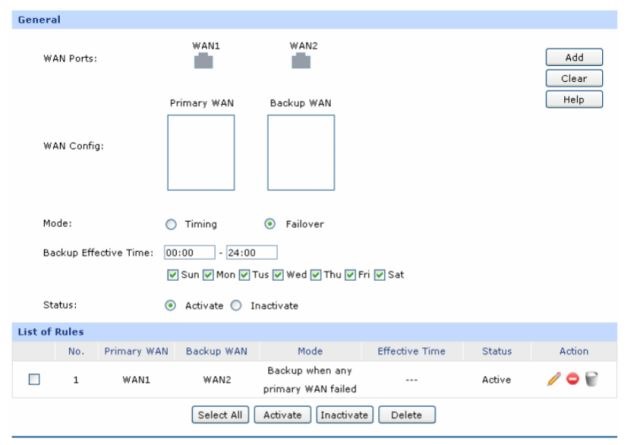
6. The router has ability to configure traffic to particular WAN based on time in the page Advanced-Load Balance-Policy Routing, but I didn’t go for it. In Advanced-Load Balance-Link Backup, you should see two WAN Ports: WAN1, WAN2, select Mode: Failover, Status: Active, Press Add. This should automatically enable WAN2 when WAN1 fails, which is what we want.
7.Change the device password from default to something secure. Check all the settings once, reboot all the devices.
Wireless Access Points
The configuration for the 3 Wireless Access Points is broadly the same, so I won’t detail individual steps which vary between the devices (Zyxel, Netgear, D-Link). Instead, I will outline the idea below.
1.Set the individual device IP as 192.168.0.31 for Wi-Fi AP1, 192.168.0.32 for Wi-Fi AP2, 192.168.0.33 for Wi-Fi AP3; subnet: 255.255.255.0. Remember the idea is to have all the devices in the same subnet as the Load-balancer (in our case the last but one octet has to be 0)
2.Set in each device the same SSID: <MYCOMMONSSID>. You can give any name you wish, but ensure the exact same name (including the case) is given as SSID in all the 3 devices.
3. Set the same encryption type, same shared key in all the devices. Encryption: WPA2-PSK [AES], Shared Key: <MYSECRETPASSWORD>. You can give any password/shared key you wish, but ensure the exact same (including the case) is given in all the 3 devices.
4.Set the wireless channel to be different in each device say Channel 3 for Wi-Fi AP1, Channel 6 for Wi-Fi AP2, Channel 9 for Wi-Fi AP3. The idea is to space out the channels between the APs, to avoid signal collisions
5. Set the same wireless mode in all 3 devices, in my case the least common denominator for all the 3 devices I had was Mode: B & G, so I selected the same in all the 3 devices
6. Set in all 3 devices, DHCP: Disabled, DNS: From ISP as we will get these details from the Load-balancer. There can be only DHCP server and in our case it will be the load-balancer
7.Change all the devices password from default to something secure. Check all the settings once, reboot all the devices including the Ethernet switch to avoid any ARP remembrances
Devices
From each of your mobile devices, select the SSID (you should see just one where ever you go in your house now), type in the common password (shared key) and voila, you should get connected. When you move too quickly (like running) from one room to another give the device a minute to switch from one wireless AP to another. In my case I found the Nokia Lumia phones to switch without any fuss when I moved between rooms, but strangely iPad3 takes a whole minute to readjust. But after the initial delay all the device I had worked seamlessly across the access point and between the two DSL broadband connections.
Update: How to expose local server through LB?
Few weeks after publishing this post, on 15th April 2014 I received an email from a reader Mr.Sarathy RPS saying “Thank you for the excellent post on the load balancing router. I took the clue and implemented the exact same in my office. I have a challenge now! We have an internal TFS which needs to be exposed to outside world with a specific port open. We are using a static IP and it was configured as virtual server in our Netgear router before, it was working fine. Now with this new setup, what needs to be configured on the Airtel modem & what in the load balancing router. In the load balancing router, I have given a specific IP to the server“.
I suggested to him with this reply “While it will be possible to configure a server behind the LB, since it its behind two NAT (Modem & LB) it may prove to be difficult to setup. I will suggest this. Put a plain 4 Port Network Switch, connect your MODEM to that, from Port1 of your switch connect it to your LB. In Port 2/3/4 you can connect your server. Now you need to configure the Modem to route the Static IP to the server, this configuration should be very similar to what you did with Netgear router earlier. This article might help“
Sarathy had followed up on this and figured out a solution to his requirement. He was kind enough to share the solution with readers of my blog. Thanks Sarathy.
You can download the documentation here or read below, on the steps Sarathy followed to expose his local server to internet through the load balancer & modem.
Excellent article! this is why I visit your blog almost everyday…
I am going to try this for sure. Thank you once again!