

If you are like me who grew up in the 1980s, you will no doubt have a huge collection of old Audio cassettes (Tapes) that contain your childhood favourites but now lying somewhere collecting dust. Today you should be lucky to be having a cassette player in working condition to play them. A decade back I started hunting for my favourite albums/movies and managed to buy most of them as Audio CDs or MP3 CDs, but I still long for digitising my old tapes so that I can listen to them wherever I want. So a few years back I bought an inexpensive cassette player which has a stereo speaker out (1/8″ TRS Jack in the USA or 3.5mm miniature EP Jack in India, which is the standard type used in your iPod, Computer speakers). To record involved four steps:
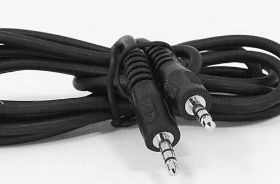
- I connected the Speaker-out from the player to the Line-In in my PC using a standard 3.5mm Stereo Audio Patch cable like the one shown below. The audio quality depends on the quality of the cable and the pins used, so buy the best-looking one or a branded one that you can find in your local electronics store.

3.5mm Stereo Audio Patch cable
- The recording quality turned out to be good, but setting the correct volume level in the player and Mic-level in the PC was tricky. That part took me a few hours to set it right, too high the volume in the player then you can listen to the audio in your PC speakers but nothing gets recorded and too low the recorded song can’t be heard while playing back.
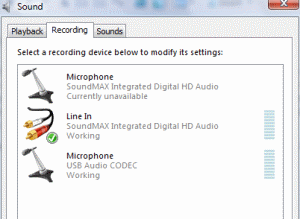
- Setup Line-In as the default “Recording Device” in Windows. This can be done in Windows Vista by Right-Clicking on the Speaker system tray icon (bottom-right before time) and selecting “Recording Devices”. Then in the dialog box (as shown below) that appears Right-Click and select “Set as Default Device”. You might want to double-click on the Line-in Icon and adjust the audio levels for fine-tuning. If everything is working well, then when you play something in your player you will see the bars on the right-hand side of the Line-In row moving up and down.
Sound Recording settings in Windows
- The software used to record took some experimentation as well but was easier. I settled down with using the free Windows Media Encoder to record the songs as WMA files and then converting songs that I needed in my iPhone alone to MP3 files using Nero WaveEditor. I was not comfortable with direct recording into Nero WaveEditor or the free Audacity equivalent. If you are using Windows Vista, you can also try the inbuilt Sound Recorder that now supports durations longer than 60 seconds but it doesn’t offer the level adjustment controls found in Windows Media Encoder.
That’s all it takes to record your tapes as WMA/MP3 files. You are now good to throw away your cassettes.
Part 2
Part 2 of this story happened about six months back when during my trip to the USA in June ’08 I purchased a device to make the conversion easier. The device was ION Audio’s Tape2PC. I saw it online and ordered through Amazon for $130 or so. The device claimed to make it easier to convert the tapes to MP3 using bundled software and the USB connection (so no cable hunting). I presumed the software does auto-rewinding to the beginning of the cassette, identifying each track automatically and auto-reversing once one side of the tape is over so that we don’t need to babysit during the entire tape.
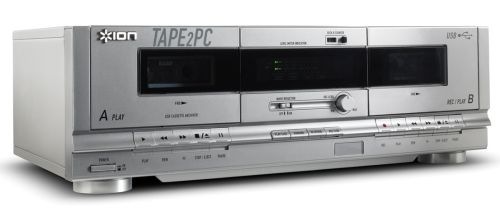
ION Tape2PC
After I got back to India, I never found the time (or the interest) to set up this device until last Sunday. That’s when I unwrapped the box, connected the cables and without a moment’s thought switched the Power-ON. I got the display lights for a second and the device went blank. That’s when it struck me that the device was 110V and I connected it to 220V (in India), and the power supply inside the device should have been burned. The next day I gave the device to my local Electronic Repair shop (Rajam Electronics, Station Road, West Mambalam, Chennai -33. Phone: 044-2474 0106) to fix it. They diligently worked on it, fixed it and gave it to me today. They charged me Rs.400 (USD 8) towards their service charge and for replacing the 110V transformer with 220V and a few other components that got burned. I brought the device home and plugged it in, Windows Vista promptly deducted the device as a USD Audio CODEC and it worked just fine. The burning episode was a blessing in disguise, now I don’t need to keep connecting every time a 220V-110V Step-Down adaptor.
The device turned out to be a slight-disappointment. The audio quality was great due to the USB interface, but the software functionality was limited. No Auto Track Identification, No Auto-Rewind, No Auto-Reverse – you need to babysit throughout the cassette play time, no escape from that. The inbuilt software (EZ Tape Converter) does make it easy to mark each track, tagging easier and moves automatically the completed tracks to iTunes. You can find a detailed product review of Tape2PC from UK’s PCAdvisor here – I suggest you read it before you decide to buy this device. My opinion is that if you don’t mind spending a few minutes extra for each cassette and you don’t have that many cassettes then you can save yourself some money by not buying this. Instead, go with my alternate method suggested in Part 1 of this post.
Update 31/August/2017: Nowadays, there are much smaller and cheaper devices to do the conversion, I have written an updated post here.
Hi,
No need to spend so much money. Use any of the following methods.
http://www.wikihow.com/Transfer-Cassette-Tape-to-Computer
Regards,
Lava kumar
Please let me know the weather audio casette’s will be converted into MP3, and what will be the charges.
Sopna, this device was my personal purchase. I am using it to convert my own audio cassettes to MP3. I am not offering this as a service to 3rd parties. You may find shops in Ritchie Street who can help you on that.
Hi PB, Since I do many trips abroad, I don’t find that much items to bring back, especially everywhere now it is the same "Chinese" goods. Each trip I bring only few items electronics, or toys to my son and if there are more I leave it in USA for my next trip or send it through the next colleague who comes back to India.
In my experiences with customs in Chennai (with couple of trips in Mumbai) it is all about how you explain it to them, they should feel that it is for your personal use and not for resale – and the quantities should justify that. Then they don’t charge you any customs. They are understanding and (and touch wood) I haven’t had any problems with them so far.
Just a quick question since you purchase so many items from US; do pay lost of custom taxes at the airport or just claim it under business since you are the boss? Because when I visit India each time it is hard to get through the customs if we have any electronics or alcohol.
Thanks,
PB.