Setting up Debugging ASP (vanilla Active Server Pages, not ASP.NET) has always been tricky. I remember doing it for the first time as early as 1998 or so. It was during MS Visual Interdev launch in Chennai, which happened to be my first presentation for Microsoft India as well. Those days, it was on Windows NT 4.0 SP4 & IIS 4.0. The whole installation normally would take those days (with those ancient hardware) about half a day.
Anyways, today we were setting up a web application that was written by us long time back on ASP. We successfully restored the DB, copied the source into a Windows 2003/IIS 6.0 machine and tried to run. We got strange errors and figured out that if we are going to get this working, we need to debug the application line by line. So started the effort of getting a simple ASP page debugged in Windows 2003. After nearly 4 hours strangely I got it working across 3 different OS configurations!
Before going to the steps, remember that setting up Native Debugging (in fact, any form of Debugging) in a Production Web Server is a big security risk and performance degrade, so please do it only on your Development machines.
Windows XP (32-bit) SP2, IIS 5.1 & Visual Studio.NET 2003
- Ensure the currently logged in user who is running Visual Studio.NET is a member of the “Debugging Users” group in the computer.
- Ensure you have IIS 5.1 installed with Frontpage extensions enabled. Try creating a simple Visual Basic.NET ASP.NET Web application and run it.
- Once it runs successfully, add a new file into the project and name it “Check.asp” or any other name, but .asp file extension. Then have a simple <% Response.Write (“Welcome”) %> ASP line, setup the breakpoint on this line.
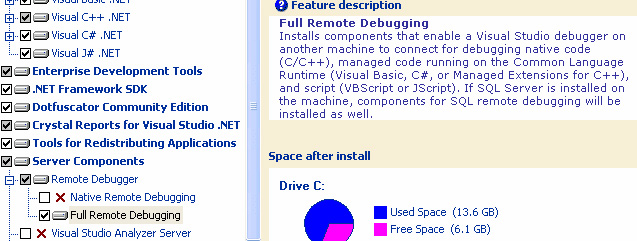
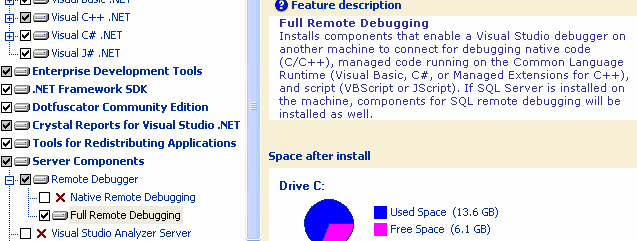
- Run VS.NET 2003 Setup, and ensure you have either Native Remote Debugging or Full Remote Debugging (as shown below) enabled. I think these features are available only VS.NET Enterprise Editions. If not, have it installed.

- Then right-click on the VS.NET web project properties, in Configuration Properties -> Debugging, select ASP Debugging (as shown below)

- Open in Notepad URLScan Configuration file (normally found at C:\WINDOWS\system32\inetsrv\urlscan\urlscan.ini). This comes pre-installed with Windows XP SP2. Add a line in the [AllowVerbs] section, DEBUG. This is to add an allowed Verb, in this case DEBUG, HTTP method.
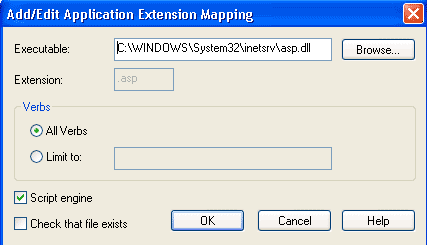
- Go to IIS MMC Snap-in. Right Click on Web Sites, go to Home Directory Tab, click on Configuration button. Goto to Mappings tab, select .asp row, click Edit. In that dialog box, select All Verbs (as shown below). Press OK all way down.

- Reset IIS, using IISRESET command from Command Prompt or IIS Snap-In.
- Go to the VS.NET Web Application, right-click on the ASP file (Check.asp) and Set as Start Page.
- Run the VS.NET application in Debug mode by pressing F5, you should hit the break point. Good Luck.
The above steps work only if both IIS and VS.NET are on the same machine and you are also administrator to the box. Both these may be rare (and potential security bad-practise) in a real scenerio. In that case refer to my general items to check at the bottom.
Windows XP (64-bit) or Windows 2003, IIS 6.0 & Visual Studio.NET 2003
Windows XP 64 bit, ships with IIS 6.0. So remember to Allow the Active Server Pages, in Web Server Extensions page in IIS snap in. Apart from this you should follow all the steps I have told above for Windows XP 32-bit.
Some webpages, talk about running IIS 6.0 in IIS 5.1 mode, I don’t think so it is necessary. IIS 6.0 perfectly supports debugging of ASP pages with VS.NET 2003.
Windows 2003/Windows-XP (64 bit), IIS 6.0 & Visual Interdev
- Ensure your IIS is up and running.
- Then Allow Active Server Pages, in Web Server Extensions page in IIS snap in.
- Create a simple ASP page, run it and check that it is working correctly.
- Have the second CD of Visual Studio 6.0 handy. Launch the setup and select “Server Components”, choose “Backoffice Server components”, press Install, in that ensure you have Visual Interdev Server and Remote Debugging components selected. Install them.
- Reboot the machine.
- Install Visual Studio 6.0 Service Pack 6.0 and Reboot the machine.
- Create a simple Web project in Visual Interdev and run it. Most probably your Front Page Server extensions will need tweaking, set it up.
- Create a simple ASP page, name it “Check.asp” or any other name. Then have a simple <% Response.Write (“Welcome”) %> ASP line, setup the breakpoint on this line.
- Refer and ensure you have all the points mentioned in my section “General Items to check” below, especially #2 & 3.
- Run it, it should work. If not doesn’t worry, normally it takes more than few hours to get this working especially with IIS 6.0.
- Refer to this support page at Microsoft at “INFO: Visual InterDev 6.0 Debugging Resources“, which contains a host of links on this issue. Since many of the contents here are dated and for Windows NT 4.0/9x,
General Items to check
Even with all the above, you couldn’t get it working, check out the following:
- Ensure the currently logged in user who is running Visual Studio.NET is a member of the “Debugging Users” group in the computer. You may also want to add “INTERACTIVE, NETWORK SERVICE, IWAM_MACHINENAME” users into the group for testing and once everything works out, keep removing them one by one.
- The official pages: Visual Studio Remote Debugging Setup index page and ASP Remote Debugging Setup. The second link talks of adding few registry keys. For convenience, I have saved it as a text file here. Download and save it in your machine with .REG file extension and run it. It will add the necessary registry keys.
- Check whether you have enabled ASP Server side script debugging enabled. This can be done in IIS Snap In, Web Sites, Right-Click Properties, Home Directory Tab, Click on the configuration button, go to Debugging Tab (as shown below):

- Go to Component Services from Control Panel. Go to Computers->My Computer->DCOM Config, in that select the Catalog Class object. Right Click and go to Security Tab. In that Select Access Permissions area. Select Customize, press Edit and ensure to add all the relevant users (like IWAM_MACHINENAME, NETWORK SERVICE, INTERACTIVE, etc.). NETWORK SERVICE user will exist only on IIS 6.0 (Windows XP 64 bit and on Windows 2003), so if it doesn’t exist, it is OK.
- In the Catalog Class properties dialog, select Identity tab, ensure “The Launching user” is selected.


